Tutorials
Build a master-detail app with Angular
This tutorial introduces you to the fundamentals of building a NativeScript app with Angular by walking you through building an example app with some basic functionalities.
This tutorial will teach you the following:
- Build layouts using NativeScript components
- Add interactivity to your app using gestures
- Use built-in Angular directives to create and modify your views
- Use routing to navigate between different views
Prerequisites
To get the most out of this tutorial you should already have a basic understanding of the Angular framework. If you're completely new to Angular, you might want to try the official Angular tutorial first.
Overview of the example application
Components form the basic building blocks of an Angular application. Components represent the pages and views that the user interacts with. NativeScript Angular follows the same concept with the difference being primarily within the component's HTML template layer and its styling.
You'll build a master-details app that displays a list of musicals and allows you to navigate to a details page to view more information about each musical.
You can find the complete source code of the application on GitHub
Set up your environment
To set up your development environment, follow the instructions in the Environment Setup section of the docs.
Create a new NativeScript Angular application
To create a new NativeScript Angular application, run the CLI command ns create with the name of the application followed by --ng.
ns create example-app --ngThe NativeScript CLI creates a new directory with the root folder named example-app with an initial skeleton app project and installs the necessary packages and dependencies. This can take a few minutes and should be ready to run once it's done installing.
Run the application
Go to the project's directory and run the following command to run it on the respective platforms.
cd example-app

// run on iOS
ns run ios

// run on Android
ns run android
The ns run command builds the app and launches the app on a connected Android device or Android emulator for Android and a connected iOS device or iOS simulator for iOS. By default, it listens for changes in your code, synchronizes those changes, and refreshes all selected devices.
Folder structure
Based on the Angular starter app, we will be creating the following file/folder structure for our application.
src/app
  |- assets
    |- anastasia.png
    |- beetlejuicemusical.png
    |- bookofmormon.png
  |- core
    |- models
      |- flick.model.ts
    |- services
      |- flick.service.ts
  |- features
    |- home
      |- home.component.ts | html
      |- home.module.ts
      |- home-routing.module.ts
    |- details
      |- details.component.ts | html
      |- details.module.ts
      |- details-routing.module.ts
  ...
Create the home page
Let's start with creating the files for our home feature with the following contents:
<!-- src/app/features/home/home.component.html -->// src/app/features/home/home.component.ts
import { Component } from '@angular/core'
@Component({
moduleId: module.id,
selector: 'ns-home',
templateUrl: 'home.component.html',
})
export class HomeComponent {}// src/app/features/home/home-routing.module.ts
import { NgModule } from '@angular/core'
import { Routes } from '@angular/router'
import { NativeScriptRouterModule } from '@nativescript/angular'
import { HomeComponent } from './home.component'
export const routes: Routes = [
{
path: '',
component: HomeComponent,
},
]
@NgModule({
imports: [NativeScriptRouterModule.forChild(routes)],
})
export class HomeRoutingModule {}// src/app/features/home/home.module.ts
import { NgModule, NO_ERRORS_SCHEMA } from '@angular/core'
import { NativeScriptCommonModule } from '@nativescript/angular'
import { HomeRoutingModule } from './home-routing.module'
import { HomeComponent } from './home.component'
@NgModule({
imports: [NativeScriptCommonModule, HomeRoutingModule],
declarations: [HomeComponent],
schemas: [NO_ERRORS_SCHEMA],
})
export class HomeModule {}Routing setup
We will be setting up our HomeModule as a lazy-loaded module and as the default route. Open app-routing.module.ts and add the following code:
// src/app/app-routing.module.ts

import { NgModule } from '@angular/core'
import { Routes } from '@angular/router'
import { NativeScriptRouterModule } from '@nativescript/angular'

const routes: Routes = [
  // Update this 👇
  { path: '', redirectTo: '/home', pathMatch: 'full' },

  // Add this 👇
  {
    path: 'home',
    loadChildren: () => import('./features/home/home.module').then(m => m.HomeModule)
  }
]

@NgModule({
  imports: [NativeScriptRouterModule.forRoot(routes)],
  exports: [NativeScriptRouterModule]
})
export class AppRoutingModule {}
Note
By default, NgModules are eagerly loaded, which means that they get loaded as soon as the application loads. Lazy-loaded modules on the other hand loads NgModules as needed. Lazy-loaded modules in NativeScript are handled the same way as a web Angular Application. You can read more about lazy loading modules here.
Home UI
Before we create the UI of our home page, let's create our FlickModel and FlickService first. This will allow us to use the data directly in our template.
FlickModel will contain the shape of each flick object. Create a models directory inside core and create a new file called flick.model.ts. Open the new flick.model.ts and add the following interface:
// src/app/core/models/flick.model.ts

export interface FlickModel {
  id: number
  genre: string
  title: string
  image: string
  url: string
  description: string
  details: {
    title: string
    body: string
  }[]
}
We will then use the FlickModel in our FlickService to return our flick data. Create a services directory inside core and create a new file called flick.service.ts. Open the new flick.service.ts and add the following:
// src/app/core/services/flick.service.ts

import { Injectable } from '@angular/core'
import { FlickModel } from '~/app/core/models'

@Injectable({
  providedIn: 'root',
})
export class FlickService {
  private flicks: FlickModel[] = [
    {
      id: 1,
      genre: 'Musical',
      title: 'Book of Mormon',
      image: '~/app/assets/bookofmormon.png',
      url: 'https://nativescript.org/images/ngconf/book-of-mormon.mov',
      description: `A satirical examination of the beliefs and practices of The Church of Jesus Christ of Latter-day Saints.`,
      details: [
        {
          title: 'Music, Lyrics and Book by',
          body: 'Trey Parker, Robert Lopez, and Matt Stone',
        },
        {
          title: 'First showing on Broadway',
          body: 'March 2011 after nearly seven years of development.',
        },
        {
          title: 'Revenue',
          body: 'Grossed over $500 million, making it one of the most successful musicals of all time.',
        },
        {
          title: 'History',
          body: 'The Book of Mormon was conceived by Trey Parker, Matt Stone, and Robert Lopez. Parker and Stone grew up in Colorado and were familiar with The Church of Jesus Christ of Latter-day Saints and its members. They became friends at the University of Colorado Boulder and collaborated on a musical film, Cannibal! The Musical (1993), their first experience with movie musicals. In 1997, they created the TV series South Park for Comedy Central and in 1999, the musical film South Park: Bigger, Longer & Uncut. The two had first thought of a fictionalized Joseph Smith, religious leader and founder of the Latter Day Saint movement while working on an aborted Fox series about historical characters. Their 1997 film, Orgazmo, and a 2003 episode of South Park, "All About Mormons", both gave comic treatment to Mormonism. Smith was also included as one of South Park\'s "Super Best Friends", a Justice League parody team of religious figures like Jesus and Buddha.',
        },
        {
          title: 'Development',
          body: `During the summer of 2003, Parker and Stone flew to New York City to discuss the script of their new film, Team America: World Police, with friend and producer Scott Rudin (who also produced South Park: Bigger, Longer & Uncut). Rudin advised the duo to see the musical Avenue Q on Broadway, finding the cast of marionettes in Team America similar to the puppets of Avenue Q. Parker and Stone went to see the production during that summer and the writer-composers of Avenue Q, Lopez, and Jeff Marx, noticed them in the audience and introduced themselves. Lopez revealed that South Park: Bigger, Longer & Uncut was highly influential in the creation of Avenue Q. The quartet went for drinks afterward and soon found that each camp wanted to write something involving Joseph Smith. The four began working out details nearly immediately, with the idea to create a modern story formulated early on. For research purposes, the quartet took a road trip to Salt Lake City where they "interviewed a bunch of missionaries—or ex-missionaries." They had to work around Parker and Stone\'s South Park schedule. In 2006, Parker and Stone flew to London where they spent three weeks with Lopez, who was working on the West End production of Avenue Q. There, the three wrote "four or five songs" and came up with the basic idea of the story. After an argument between Parker and Marx, who felt he was not getting enough creative control, Marx was separated from the project.[10] For the next few years, the remaining trio met frequently to develop what they initially called The Book of Mormon: The Musical of the Church of Jesus Christ of Latter-day Saints. "There was a lot of hopping back and forth between L.A. and New York," Parker recalled.`,
        },
      ],
    },
    {
      id: 2,
      genre: 'Musical',
      title: 'Beetlejuice',
      image: '~/app/assets/beetlejuicemusical.png',
      url: 'https://nativescript.org/images/ngconf/beetlejuice.mov',
      description: `A deceased couple looks for help from a devious bio-exorcist to handle their haunted house.`,
      details: [
        {
          title: 'Music and Lyrics',
          body: 'Eddie Perfect',
        },
        {
          title: 'Book by',
          body: 'Scott Brown and Anthony King',
        },
        {
          title: 'Based on',
          body: 'A 1988 film of the same name.',
        },
        {
          title: 'First showing on Broadway',
          body: 'April 25, 2019',
        },
        {
          title: 'Background',
          body: `In 2016, a musical adaptation of the 1988 film Beetlejuice (directed by Tim Burton and starring Geena Davis as Barbara Maitland, Alec Baldwin as Adam Maitland, Winona Ryder as Lydia Deetz and Michael Keaton as Betelgeuse) was reported to be in the works, directed by Alex Timbers and produced by Warner Bros., following a reading with Christopher Fitzgerald in the title role. In March 2017, it was reported that Australian musical comedian Eddie Perfect would be writing the music and lyrics and Scott Brown and Anthony King would be writing the book of the musical and that another reading would take place in May, featuring Kris Kukul as musical director. The musical has had three readings and two laboratory workshops with Alex Brightman in the title role, Sophia Anne Caruso as Lydia Deetz, Kerry Butler and Rob McClure as Barbara and Adam Maitland.`,
        },
      ],
    },
    {
      id: 3,
      genre: 'Musical',
      title: 'Anastasia',
      image: '~/app/assets/anastasia.png',
      url: 'https://nativescript.org/images/ngconf/anastasia.mov',
      description: `The legend of Grand Duchess Anastasia Nikolaevna of Russia.`,
      details: [
        { title: 'Music and Lyrics', body: 'Lynn Ahrens and Stephen Flaherty' },
        {
          title: 'Book by',
          body: 'Terrence McNally',
        },
        {
          title: 'Based on',
          body: 'A 1997 film of the same name.',
        },
        {
          title: 'Background',
          body: `A reading was held in 2012, featuring Kelli Barret as Anya (Anastasia), Aaron Tveit as Dmitry, Patrick Page as Vladimir, and Angela Lansbury as the Empress Maria. A workshop was held on June 12, 2015, in New York City, and included Elena Shaddow as Anya, Ramin Karimloo as Gleb Vaganov, a new role, and Douglas Sills as Vlad.
        The original stage production of Anastasia premiered at the Hartford Stage in Hartford, Connecticut on May 13, 2016 (previews). The show was directed by Darko Tresnjak and choreography by Peggy Hickey, with Christy Altomare and Derek Klena starring as Anya and Dmitry, respectively.
        Director Tresnjak explained: "We've kept, I think, six songs from the movie, but there are 16 new numbers. We've kept the best parts of the animated movie, but it really is a new musical." The musical also adds characters not in the film. Additionally, Act 1 is set in Russia and Act 2 in Paris, "which was everything modern Soviet Russia was not: free, expressive, creative, no barriers," according to McNally.
        The musical also omits the supernatural elements from the original film, including the character of Rasputin and his musical number "In the Dark of the Night", (although that song’s melody is repurposed in the new number "Stay, I Pray You"), and introduces instead a new villain called Gleb, a general for the Bolsheviks who receives orders to kill Anya.`,
        },
      ],
    },
  ]

  getFlicks(): FlickModel[] {
    return this.flicks
  }

  getFlickById(id: number): FlickModel | undefined {
    return this.flicks.find((flick) => flick.id === id) || undefined
  }
}
Add a /src/app/assets/ directory to your project, and copy the 3 static images over from the sample project here.
Note
You can create barrel exports for your models and services to give you more flexibility in organizing your files and folders. To do this, create an index.ts in your services and models directory and export flick.service.ts and flick.model.ts respectively. You can also add another index.ts in your core folder and export your services and models directory.
Next, let's break down the layout and UI elements of the home page.
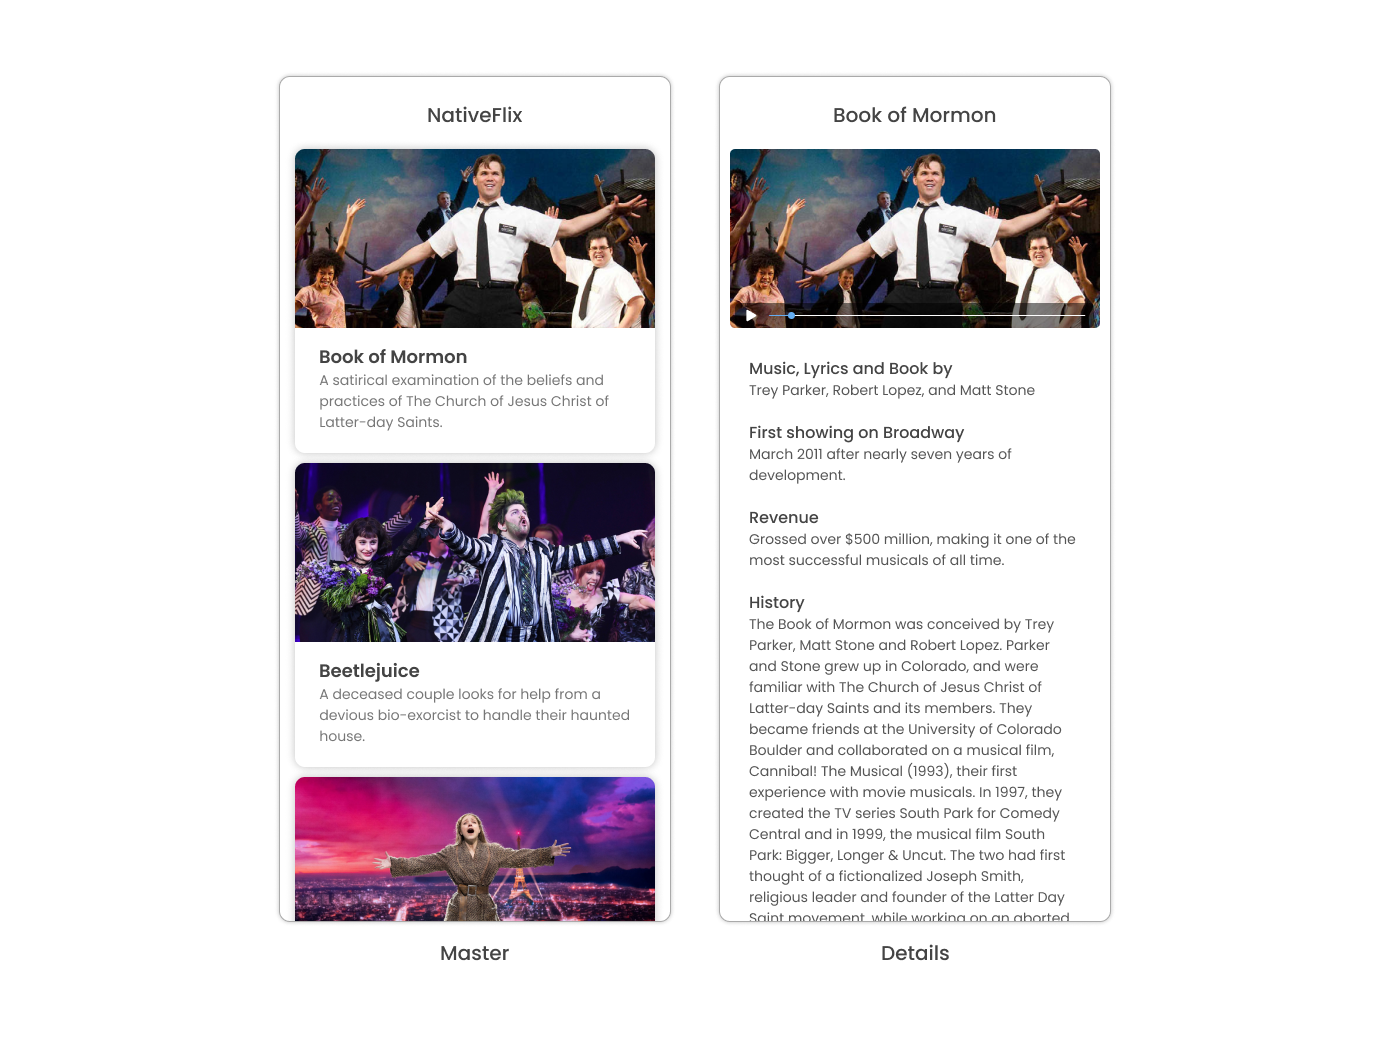
The home page can be divided into two main parts, the ActionBar with the title and the scrollable main content area with the cards (we will talk about the cards in the next section). Let's start with creating the ActionBar with the title. Open home.component.html and add the following code:
<!-- src/app/features/home/home.component.html -->

<ActionBar title="NativeFlix"></ActionBar>
Since we have an array of flicks to display we can use NativeScript's ListView component. ListView is a NativeScript UI component that efficiently renders items in a vertical or horizontal scrolling list. Let's first create a variable in our HomeComponent that we are going to use as our ListView's data source. Open home.component.ts and add the following:
// src/app/features/home/home.component.ts

import { Component } from '@angular/core'

// Add this 👇
import { FlickService } from '~/app/core'

@Component({
  moduleId: module.id,
  selector: 'ns-home',
  templateUrl: 'home.component.html'
})
export class HomeComponent {
  // Add this 👇
  flicks = this.flickService.getFlicks()

  constructor(
    // Add this 👇
    private flickService: FlickService
  ) {}
}
Next, open your home.component.html and add the ListView component:
<!-- src/app/features/home/home.component.html -->

<ActionBar title="NativeFlix"></ActionBar>

<!-- Add this 👇 -->
<ListView height="100%" separatorColor="transparent" [items]="flicks">
  <ng-template let-item="item">
    <StackLayout>
      <Label [text]="item.title"></Label>
    </StackLayout>
  </ng-template>
</ListView>
ListView uses the items property as its data source. In the snippet above, we bind the items property to the flicks property which contains an array of flicks. If you run the app now, you should see a list of flick titles.
Create flick cards
Before we dive into creating the card below, let's create some classes for our background and text colors that we will be using in the application. As this will be shared throughout the application, let's add this to the app.css. Open app.css and add the following:
/* src/app.css */

/* applied when device is in light mode */
.ns-light .bg-primary {
  background-color: #fdfdfd;
}
.ns-light .bg-secondary {
  background-color: #ffffff;
}
.ns-light .text-primary {
  color: #444;
}
.ns-light .text-secondary {
  color: #777;
}

/* applied when device is in dark mode */
.ns-dark .bg-primary {
  background-color: #212121;
}
.ns-dark .bg-secondary {
  background-color: #383838;
}
.ns-dark .text-primary {
  color: #eee;
}
.ns-dark .text-secondary {
  color: #ccc;
}
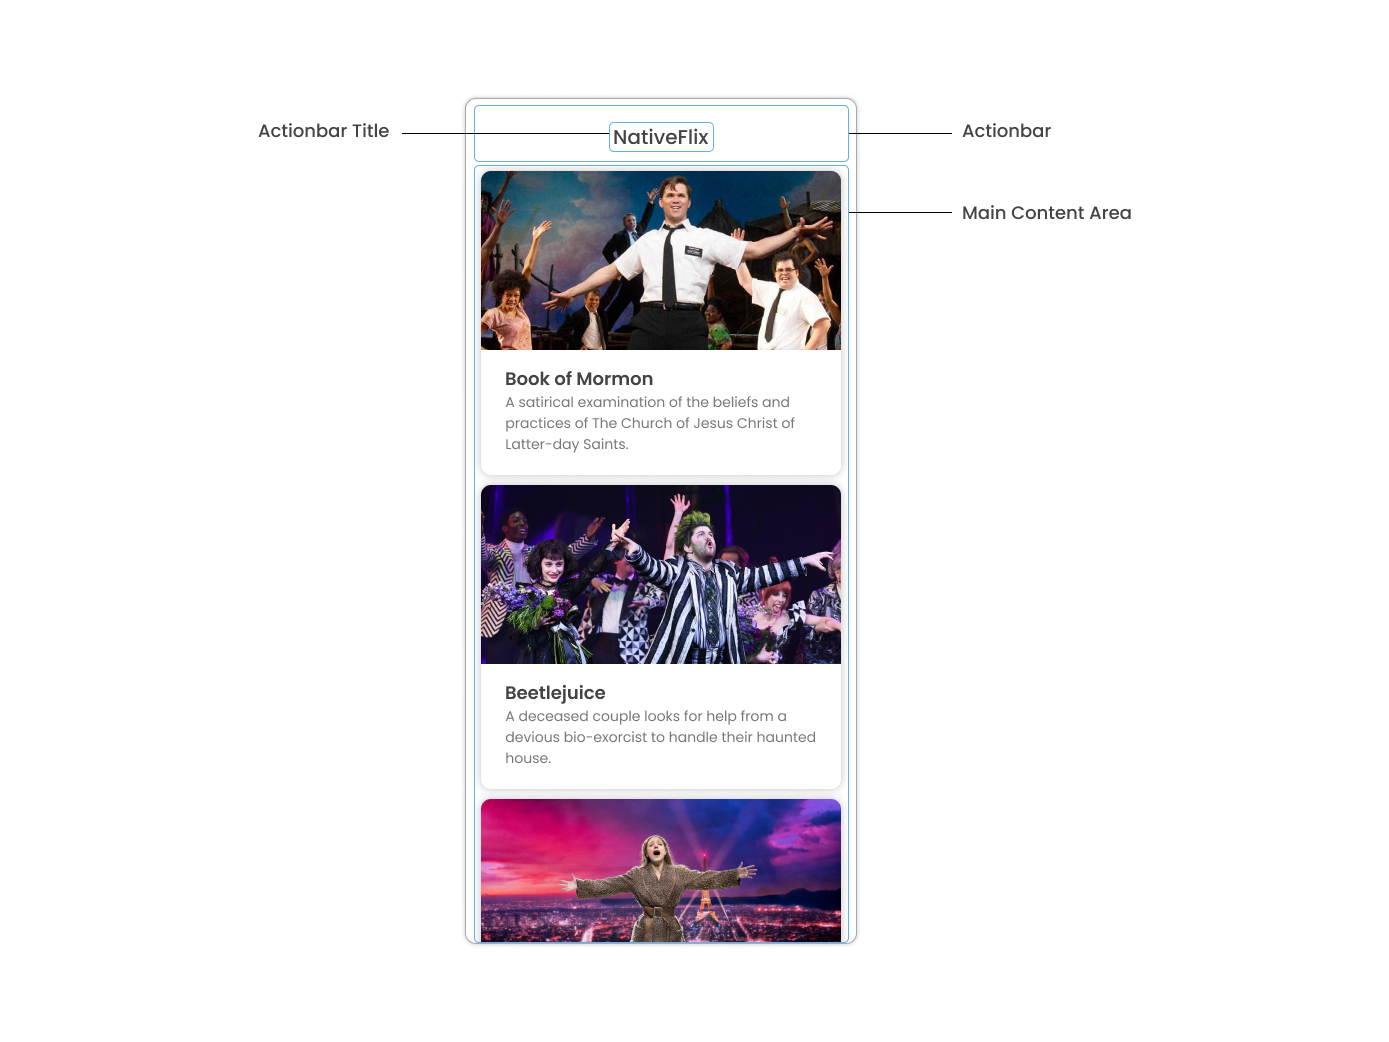
As you can see in the image above, each card is made up of 3 components, the preview image, a title, and a description. We will be using a GridLayout as our container and use the Image and Label components for the preview image and texts. Open your home.component.html and add the following:
<!-- src/app/features/home/home.component.html -->

<ActionBar title="NativeFlix"></ActionBar>

<ListView height="100%" separatorColor="transparent" [items]="flicks">
  <ng-template let-item="item">
    <!-- Add this 👇 -->
    <!-- The item template can only have a single root view container (e.g. GridLayout, StackLayout, etc.)-->
    <GridLayout
      height="280"
      rows="*, auto, auto"
      columns="*"
      class="bg-secondary"
      borderRadius="10"
      margin="5 10"
      padding="0"
    >
      <Image row="0" margin="0" stretch="aspectFill" [src]="item.image"></Image>
      <Label
        row="1"
        margin="10 10 0 10"
        fontWeight="700"
        class="text-primary"
        fontSize="18"
        [text]="item.title"
      ></Label>
      <Label
        row="2"
        margin="0 10 10 10"
        class="text-secondary"
        fontSize="14"
        textWrap="true"
        [text]="item.description"
      ></Label>
    </GridLayout>
  </ng-template>
</ListView>
Checkpoint
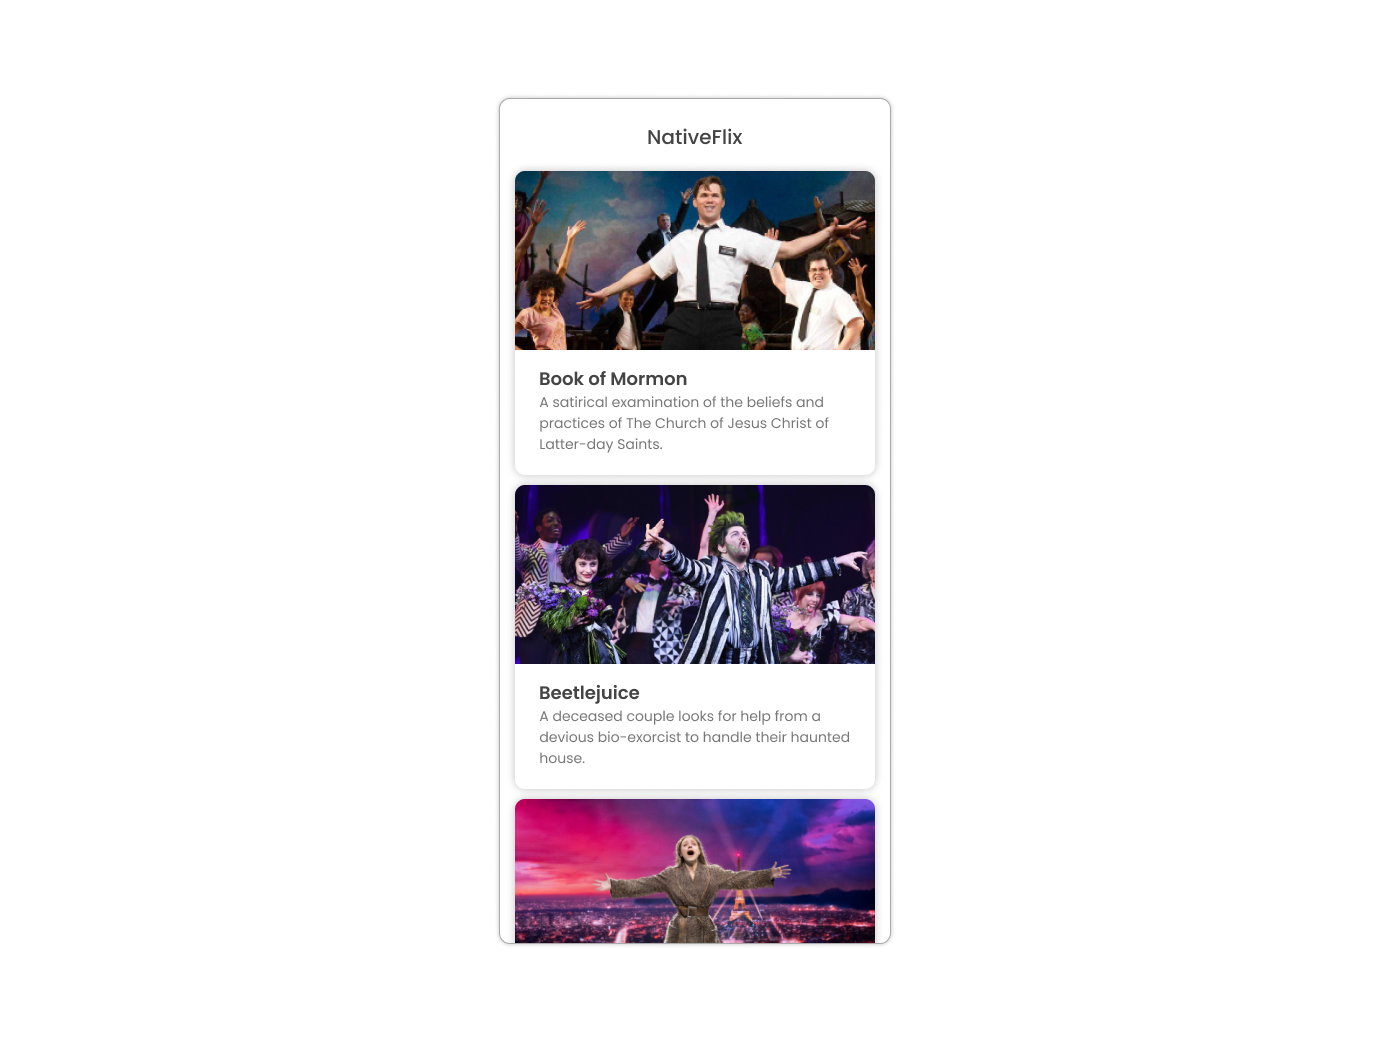
If you've followed along this far, running the app on either platform should result in an app that resembles the one in this screenshot, with the list being scrollable vertically.
Create the details page
Let's start with creating the files for our details feature with the following contents:
<!-- src/app/features/details/details.component.html -->// src/app/features/details/details.component.ts
import { Component } from '@angular/core'
@Component({
moduleId: module.id,
selector: 'ns-details',
templateUrl: 'details.component.html',
})
export class DetailsComponent {}// src/app/features/details/details-routing.module.ts
import { NgModule } from '@angular/core'
import { Routes } from '@angular/router'
import { NativeScriptRouterModule } from '@nativescript/angular'
import { DetailsComponent } from './details.component'
export const routes: Routes = [
{
path: '',
component: DetailsComponent,
},
]
@NgModule({
imports: [NativeScriptRouterModule.forChild(routes)],
})
export class DetailsRoutingModule {}// src/app/features/details/details.module.ts
import { NgModule, NO_ERRORS_SCHEMA } from '@angular/core'
import { NativeScriptCommonModule } from '@nativescript/angular'
import { DetailsRoutingModule } from './details-routing.module'
import { DetailsComponent } from './details.component'
@NgModule({
imports: [NativeScriptCommonModule, DetailsRoutingModule],
declarations: [DetailsComponent],
schemas: [NO_ERRORS_SCHEMA],
})
export class DetailsModule {}Routing setup
We will be setting up our DetailsModule as a lazy-loaded module similar to our HomeModule in the previous section. In addition to the route name, we will also pass in the flick's id as a route parameter. The route parameter is the variable following the colon in the path property. Open app-routing.module.ts and add the following code:
// src/app/app-routing.module.ts

import { NgModule } from '@angular/core'
import { Routes } from '@angular/router'
import { NativeScriptRouterModule } from '@nativescript/angular'

const routes: Routes = [
  { path: '', redirectTo: '/home', pathMatch: 'full' },
  {
    path: 'home',
    loadChildren: () => import('./features/home/home.module').then(m => m.HomeModule)
  },

  // Add this 👇
  {
    path: 'details/:id',
    loadChildren: () =>
      import('./features/details/details.module').then(m => m.DetailsModule)
  }
]

@NgModule({
  imports: [NativeScriptRouterModule.forRoot(routes)],
  exports: [NativeScriptRouterModule]
})
export class AppRoutingModule {}
Setup navigation
Now that we have the routes already set up, we can use NativeScript Angular's RouterExtensions to perform the navigation. The RouterExtensions class provides methods for imperative navigation, similar to how you would navigate with the Angular Router and Location classes. To use the class, inject it in your component constructor and call it's navigate function. Open home.component.ts and add the following:
// src/app/features/home/home.component.ts

import { Component } from '@angular/core'
import { FlickService } from '~/app/core'

// Add this 👇
import { ItemEventData } from '@nativescript/core'
import { RouterExtensions } from '@nativescript/angular'

@Component({
  moduleId: module.id,
  selector: 'ns-home',
  templateUrl: 'home.component.html'
})
export class HomeComponent {
  flicks = this.flickService.getFlicks()

  constructor(
    private flickService: FlickService,

    // Add this 👇
    private routerExtensions: RouterExtensions
  ) {}

  // Add this 👇
  onFlickTap(args: ItemEventData): void {
    this.routerExtensions.navigate(['details', this.flicks[args.index].id])
  }
}
Next, let's add the tap event to the ListView items. Open home.component.html and add the following:
<!-- src/app/features/home/home.component.html -->

<ActionBar title="NativeFlix"></ActionBar>

<!-- Update this 👇 -->
<ListView
  height="100%"
  separatorColor="transparent"
  [items]="flicks"
  (itemTap)="onFlickTap($event)"
>
  <ng-template let-item="item">
    <!-- The item template can only have a single root view container (e.g. GridLayout, StackLayout, etc.)-->
    <GridLayout
      height="280"
      borderRadius="10"
      class="bg-secondary"
      rows="*, auto, auto"
      columns="*"
      margin="5 10"
      padding="0"
    >
      <Image row="0" margin="0" stretch="aspectFill" [src]="item.image"></Image>
      <Label
        row="1"
        margin="10 10 0 10"
        fontWeight="700"
        class="text-primary"
        fontSize="18"
        [text]="item.title"
      ></Label>
      <Label
        row="2"
        margin="0 10 10 10"
        class="text-secondary"
        fontSize="14"
        textWrap="true"
        [text]="item.description"
      ></Label>
    </GridLayout>
  </ng-template>
</ListView>
Access route parameters
We passed in the id of the flick card the user tapped on in the previous section as we navigate to the details component. We can use Angular router's ActivatedRoute to get a static image of the route information shortly after the component was created. The snapshot returns a params property that contains an object with the route parameters we defined in our navigation. We can then use the id to get the selected flick information to be displayed in our details component's template. Open details.component.ts and add the following:
// src/app/features/details/details.component.ts

import { Component } from '@angular/core'

// Add this 👇
import { ActivatedRoute } from '@angular/router'
import { FlickService, FlickModel } from '~/app/core'

@Component({
  moduleId: module.id,
  selector: 'ns-details',
  templateUrl: 'details.component.html'
})
export class DetailsComponent {
  // Add this 👇
  flick: FlickModel | undefined = undefined

  // Add this 👇
  constructor(
    private activatedRoute: ActivatedRoute,
    private flickService: FlickService
  ) {}

  // Add this 👇
  ngOnInit(): void {
    const id = +this.activatedRoute.snapshot.params.id
    if (id) {
      this.flick = this.flickService.getFlickById(id)
    }
  }
}
Details UI
Let's break down the layout and UI elements of the details page.
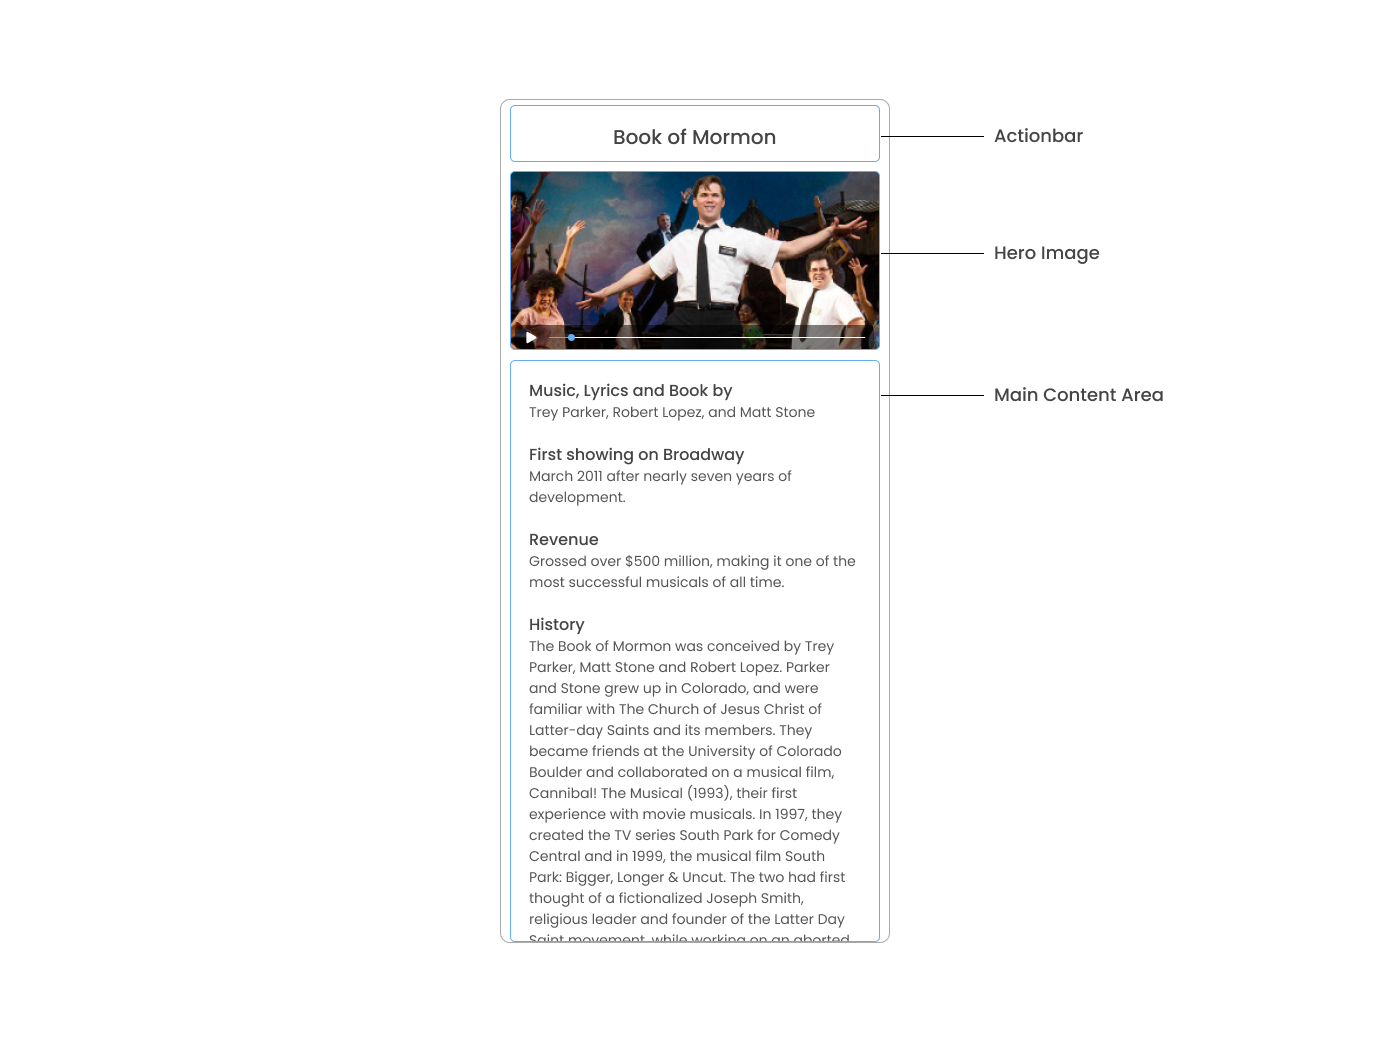
The details page can be divided into three main parts, the ActionBar with the flick title, the hero image, and the main content with the flick details. We will use the details array from our flicks object to populate the flick details section. The details array contains objects with a title and body which are rendered uniformly, each with their style. We can use Angular's *ngFor directive to loop through the array and create a UI element or set of elements for each entry in the array. Open details.component.html and add the following code:
<!-- src/app/features/details/details.component.html -->

<!-- actionbar -->
<ActionBar [title]="flick?.title"></ActionBar>

<ScrollView height="100%">
  <StackLayout>
    <!-- hero image -->
    <Image margin="0" stretch="aspectFill" [src]="flick?.image"></Image>

    <!-- main content -->
    <StackLayout padding="10 20">
      <ng-container *ngFor="let detail of flick?.details">
        <Label
          marginTop="15"
          fontSize="16"
          fontWeight="700"
          class="text-primary"
          textWrap="true"
          [text]="detail.title"
        ></Label>
        <Label
          fontSize="14"
          class="text-secondary"
          textWrap="true"
          [text]="detail.body"
        ></Label>
      </ng-container>
    </StackLayout>
  </StackLayout>
</ScrollView>
Checkpoint
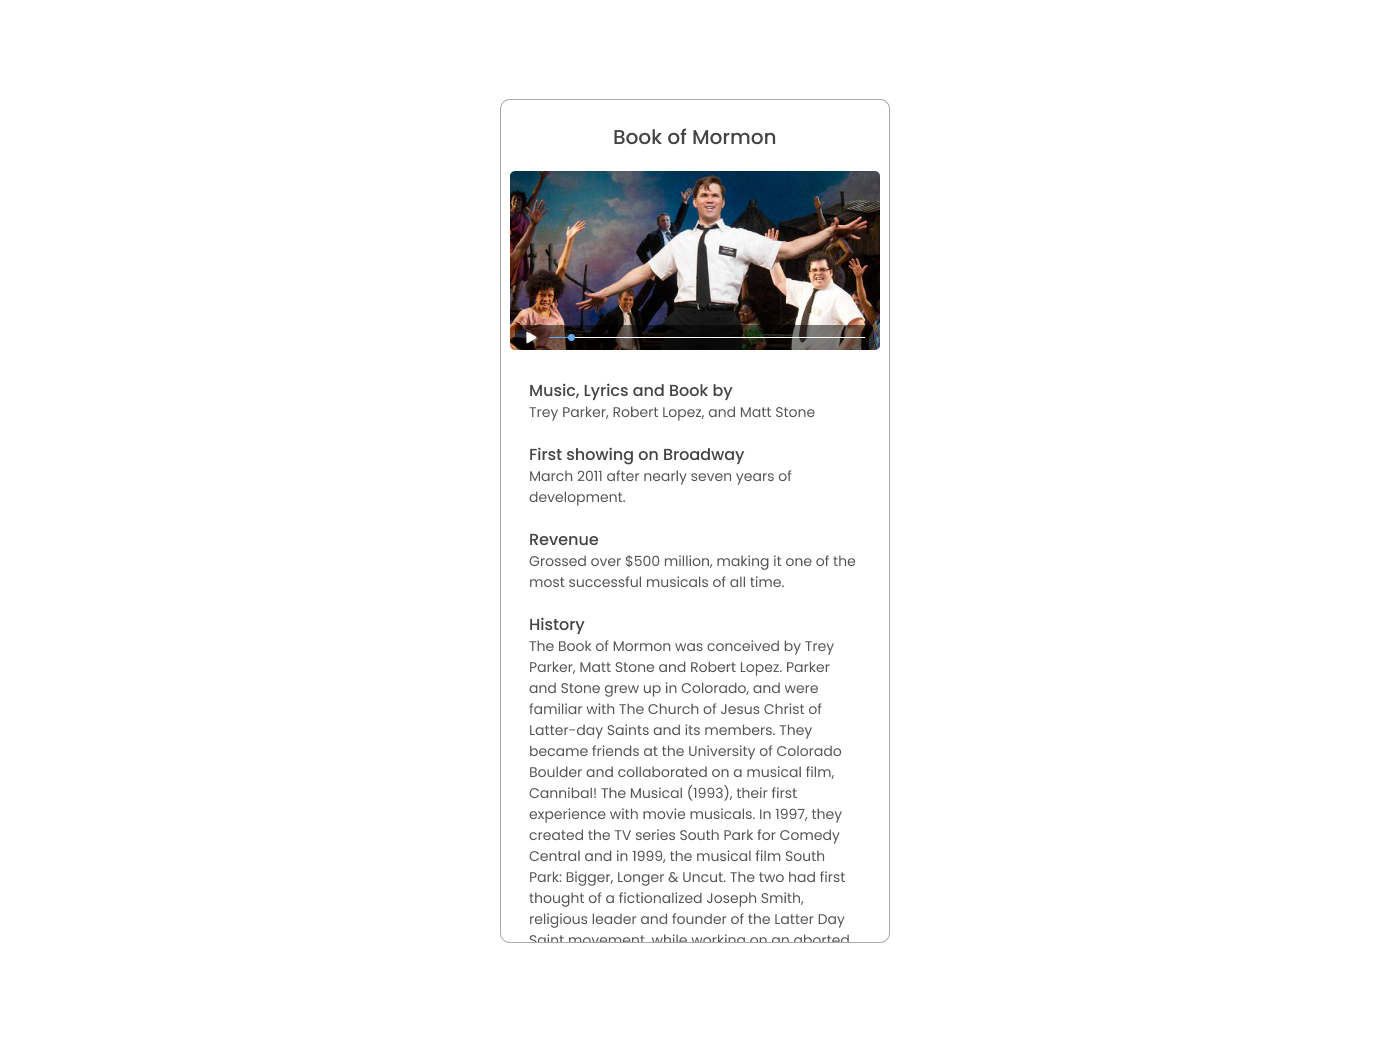
Running the app on either platform should now result in an app that resembles the one in this screenshot with the ability to navigate between the home and details pages.
What's next
Congratulations! You built your first NativeScript app that runs on both iOS and Android. You can continue adding more NativeScript UI components (or build your custom UI components), or you could add some native functionalities. The possibilities are endless!